Modern gadgets like Android smartphones suffer from the same problem: after a few months, their batteries begin to hold a charge poorly. TabletsThis also applies. The charging process also takes longer, and the battery lasts for 4-5 hours.
Sometimes the battery indicator can display completely incorrect information. You might even notice jumps from 60% to 25%, etc. And when the battery is supposedly charged, the display will show a level of 104% or higher. Furthermore, the phone may suddenly turn off. This all indicates a clear problem.
People first encounter this problem after 500 charge and discharge cycles, or, in rare cases, after 100-200.
After this, most users resort to the desperate step of buying a new battery. But don't rush; first, perform a simple battery calibration procedure.
- Android battery calibration
- When is it necessary to calibrate the battery on Android?
- Preparing the battery for calibration
- How to calibrate the battery on Android?
- Manual Android battery calibration
- Rootless Battery Calibration
- Calibration with Root rights via Recovery Mode
- How to calibrate an Android battery using Google's expert advice?
- Calibrating an Android battery using the Hard Reset menu
- Battery calibration programs
- Android Battery Calibration Myths
Android battery calibration
First of all, let's figure out what this expression means.
Android battery calibration – This is a setting for the smartphone's display system. After firmware updates, or physical damage, a malfunction sometimes occurs. As a result, the phone incorrectly displays the charge level. The Battery Stats function is designed to monitor battery capacityin the Android operating system. This is what's causing the crash.
Calibration is useless if the battery is dead. If the battery is not fully charged, capacitywill decrease. This phenomenon is caused by an increase in the active substance in the battery. As a result, the active surface area of the working substance decreases.

For example, if you charge your gadget to 70% for 1-2 months, it will only charge to that level. This is because it develops a kind of memory. It seems to unlearn how to charge to 100%. Therefore, you need to calibrate your Android battery to bring it to optimal condition. This will ultimately improve battery life and improve battery life. This is achieved by setting the correct parameters for the phone and battery controller.
Battery memory effect is a recurring loss of capacity that occurs as a result of improper charging—that is, when the battery is not fully charged.
When is it necessary to calibrate the battery on Android?
This process is necessary in the following cases:
- The battery drains quickly. The gadget starts to last less than before. So, after one month of purchase, it lasts only 3 days. After another month, it lasts only 2 days, and so on.
- It turns off by itself. It turns off even when the battery indicator shows 100%.
- If the device has been turned off for a long time.
- After changing firmware or updates.
Battery calibration on Android is performed once every 3-6 months.
Preparing the battery for calibration
Before carrying out this procedure, you should follow a number of recommendations:
- Check the battery's integrity. Remove the cover and carefully inspect the battery.
- Make sure the gadget's port is not damaged and is accepting charge.
- Copy all information from your Android smartphone to a flash drive.
- Don't interrupt the long extended calibration. Do not interfere with the process when the battery is fully discharged or charged. Otherwise, the battery will degrade further.
- It is recommended to perform the full procedure no sooner than every 3 months. This will reduce wear and tear.
- Before you calibrate your Android battery, charge your phone.
After purchasing a new device, to ensure stable battery performance, run your Android device through 5 full charge and discharge cycles. This will increase its battery life.
How to calibrate the battery on Android?
There are several ways to calibrate the battery indicator on Android. Choose the one that works best for you. There are manual and automatic options. The latter usually involves installing apps that do the work for you.
Manual Android battery calibration
You will need an Android and a charger.
Step-by-step algorithm of actions:
- Charge the battery to 100% using a regular charger or USB.
- Unplug the charger from the power outlet and turn off the phone.
- Connect the charging cable and plug it back into the power outlet.
- Repeat the third step until you see an announcement that says: “Fully charged!»
- Turn on your smartphone, go to the settings menu and turn off "sleep mode".
- Then recharge to 100%.
- After fully charging, let the phone discharge. The display must be on.
Now you can enable sleep mode.
Once the process is complete, the charging indicator should work normally. To prevent your phone from turning off when the battery is low, you can install the Pocket Battery Analyzer app. Set the settings to ignore automatic shutdown.
Through USB charging should be used rarely, only in the most extreme cases.
Battery calibration without Root right
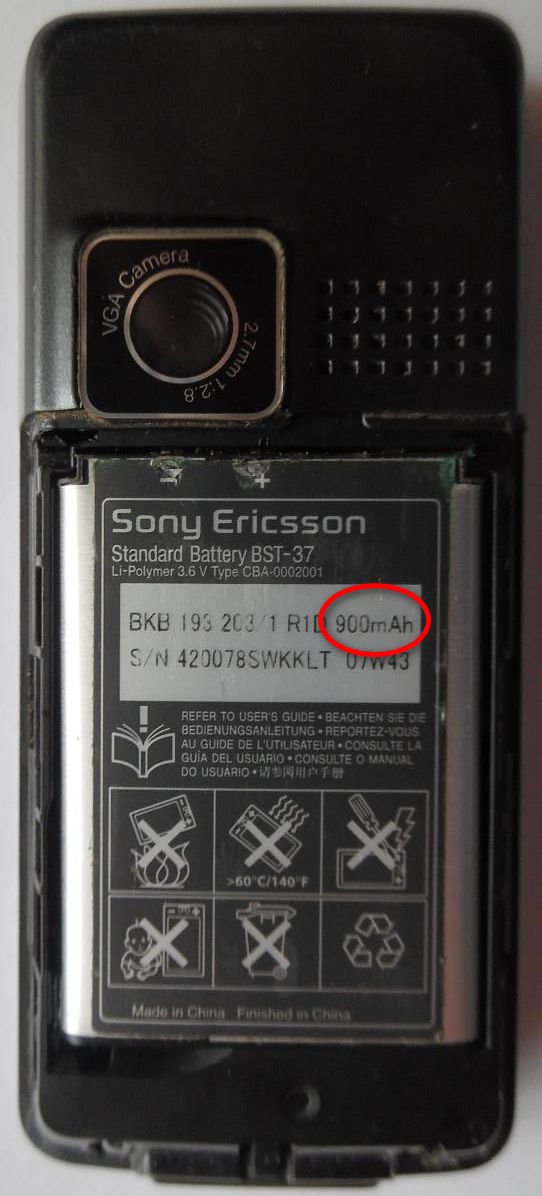
Before this process, find out the capacity of your battery in mAh. To do this, simply remove the back cover from the gadget or look it up online. Below is the capacity shown on an old Sony Ericsson. capacity.
Root rights, or "root," are superuser rights. They allow you to log into the operating system as an administrator, meaning the creator!
Calibration algorithm without root rights:
- Find out the battery capacity.
- Install the Battery Monitor or Current Widget program – it displays the charge in real time.
- Watch the charge increase. It should reach the battery's full capacity.
- Once the maximum limit is reached, for example 900 mAh, disconnect the smartphone from the network.
- Reboot your device.
As a result, the phone will understand what the real one is. capacity.
Sometimes, performing this procedure once doesn't produce the desired effect. Therefore, it's worth trying the above steps five times. Completely discharge and charge the Android battery five times.
Calibration with Root rights via Recovery Mode
This method is rare, but it does exist.
Algorithm with root:
- Go to Recovery Mode (Recovery mode).
- Open the "Advanced" item.
- Click the "wipe battery stats" The calibration will be cleared.
- Completely discharge the smartphone battery.
- Connect the device to the power outlet and charge it to 100%. Do not turn it on.
This will be enough to return the battery to normal in Recovery Mode. To ensure the results are fully restored, perform an additional calibration in the Battery Calibration app. This should be done while the smartphone is connected to a power source and fully charged.
To quickly enter Recovery Mode, simultaneously press the Volume Up and Power buttons. Devices with a physical keyboard may also require pressing the Home button.
Process in the custom menu:
- Restart your phone in recovery mode.
- Go to the main menu tab Advanced.
- Open File Manager.
- Next, go to the Data folder and then to system.
- Find batterystats.bin and click on it.
- Select Delete and repeat step 5.
That's all for now. Not everyone considers this option viable; some consider it a myth.
How to calibrate your Android battery using these tips Google specialists?
Google engineers decided to share their method for calibrating battery charge with the public.
Step-by-step calibration from a pro:
- Reduce your gadget's battery to 0%.
- Connect chargerto the phone and plug it into the network.
- Leave your phone or tablet in this state for 8 hours.
- Unplug the power cord from the power outlet.
- Turn off your smartphone.
- Connect the charger to the phone and plug it in for 1 hour.
- Disconnect the charger and turn on the gadget.
- Please wait a few minutes.
- Turn off the device.
- Put it on charge for 1 hour.
- We disconnect the charger cable, that is, we remove it from the network.
- Turn on the smartphone.
This method is suitable for the most patient.
Calibrating an Android battery using the engineering menu Hard Reset
This method is a factory reset. Once completed, all data, including battery usage, will be deleted. Licenses, programs, and user files will also be deleted. Before performing the reset, complete 5 full charge and discharge cycles on your Android battery.
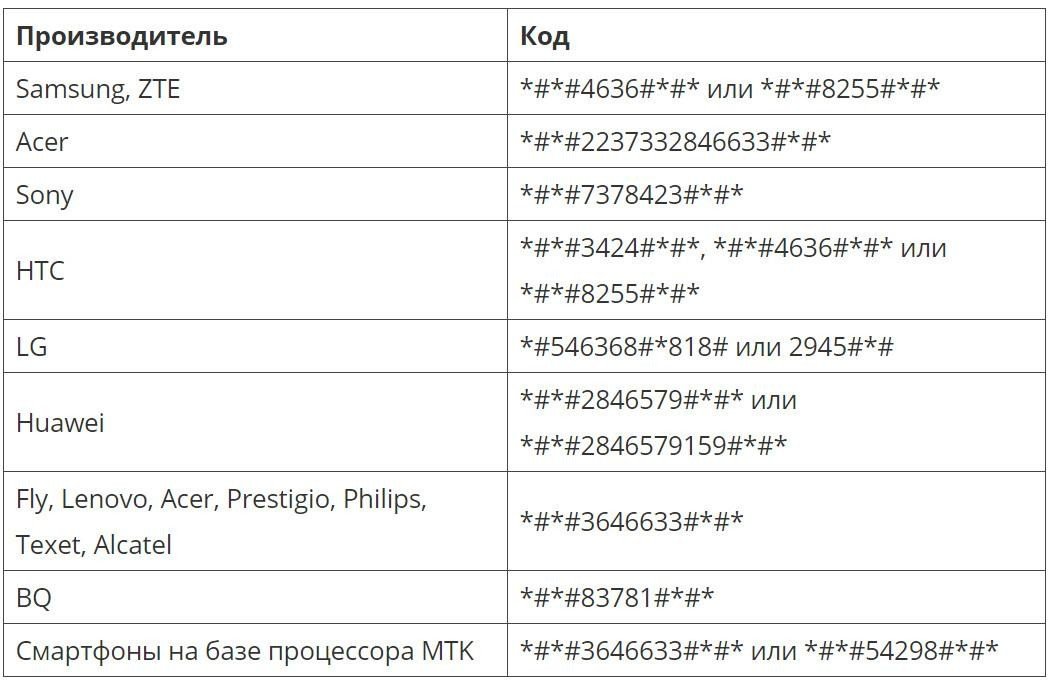
To access the engineering menu, you'll need to enter a specific number and press the call button. This number varies for each device model. If your device isn't shown in the image below, search for it online.
In difficult cases, to access system settings, install the Mobileuncle MTK Tools or MTK Engineering Menu applications.
Once you have successfully logged in, click on the “Backup and Reset” tab. Then click reset settings and confirm the action.
After this, all settings will return to their original state.
Battery calibration programs
Battery Calibration This app is used to configure the battery indicator. There are two modes: a quick one, which takes 1 minute, and a longer Android battery calibration. The second mode configures the controller more precisely. Once downloaded and installed, the app can provide step-by-step instructions. However, we'll provide a step-by-step setup plan.
Algorithm of actions:
- Run the program.
- Connect your smartphone to the charger.
- Once 100% is reached, a beep will sound. Wait another hour from this point. There's no need to disable anything.
- Exactly one hour later, press the "Calibrate» in the program menu. Wait for the process to complete.
- Pull it out chargerfrom the outlet.
- Restart your phone.
After these steps, the controller's memory will be reset. The advantage of this method is that the program does everything automatically.
Advanced Battery Calibrator - This software allows you to ensure that your smartphone sees the real battery capacity.
Battery Repair Life – an app that increases battery life. It's free and works with just one click. Using it once every 7 days will significantly extend your battery life.
Battery Calibration Pro Gratis This app helps when you have battery problems on your Android device. It helps extend battery life and overall battery life. The automatic mode does all the work for you. Calibration takes 3 minutes.
Android Battery Calibration Myths
Everything written below is a myth:
- Lithium-ion batteries don't have memory. There's no need to fight rapid discharge. The issue isn't with the battery, but with how the system reads and displays capacity data.
- Deleting the batterystats.bin file will calibrate the battery. (This file only records information about how the battery was used between charges. This information is reset each time the phone charges to 80%.) This information can be viewed in the "BATTERY" menu.
For a 3-5 year old battery, Android battery calibration may not help. You'll have to buy a new battery.


